How to Hang Art Prints and Posters the Right Way
Hanging art should be simple, right? Some picture hooks, maybe a hammer, the odd pencil mark, and boom—your stories, memories, and art are up for everyone to admire. But then you step back, and something feels... off. Maybe it’s floating awkwardly like a lost balloon or so small it looks like a postage stamp on the wall.
Art placement is an art in itself, and when done wrong, it can really detract from the memories, moments, and stories you're trying to create.
Let's fix that. Here’s how to hang your prints and posters the right way—without making your walls look like a crime scene of misplaced holes.
1. The Eye-Level Rule (That’s Not a Rule)
The classic “art should be at eye level” rule is fine in theory, but whose eye level are we talkin' about here? Shaq? Danny DeVito? Me? I'm pretty average when it comes to height. Stop! Here’s a better guide:
- For single pieces: The centre of the artwork should sit about 150-160 cm (59-63 inches) from the floor.
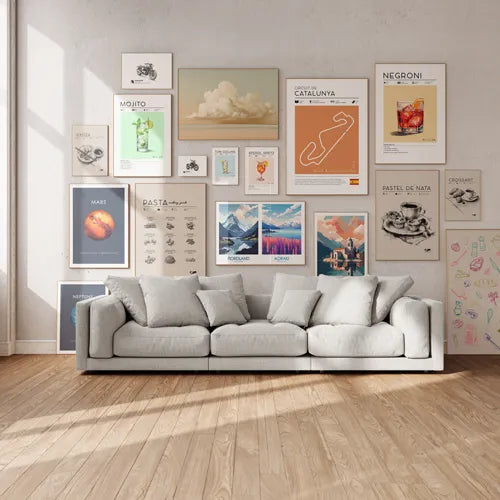
- For gallery walls: Treat the entire collection as one big piece and position the midpoint within that same range.
- Hanging over furniture? Leave about 15-25 cm (6-10 inches) of space between the bottom of the frame and whatever is beneath it (so you’re not head-butting your art every time you sit on the couch).

2. Don’t Let Your Art Drown in a Sea of...Wall
A single A4 (8x10) print floating in the middle of a giant blank wall? Honestly, in this scenario even one of our prints can't save you. You're better off with just the wall! If you have a big space, your art needs to be big too—or you need to create a gallery wall.
- A single piece should be at least two-thirds the width of the furniture below it.
- If going small, go in groups. Three or more prints work well together to create a larger visual impact.
- Use paper templates first. Cut out paper in the same sizes as your prints, tape them to the wall, and shuffle them around until it looks right—before committing to nails.
3. Symmetry vs. Asymmetry: Choose Your Fighter
- Symmetry: Ideal for a clean, classic look. Align pieces evenly, whether in rows, columns, or a neat grid.
- Asymmetry: Some will say this is more 'dynamic and modern'. I reckon it just depends on your personal style. Try a staggered arrangement with different sizes but balanced spacing.
- Odd numbers work better than even ones. Groups of three or five just feel better to the human eye—it's science, psychology, or maybe just magic.
4. Frame It Like You Mean It
Yup, a beautiful print can stand on its own, but, like so many things in life, they turn out better when you commit to it! The right frame will make that beautiful print really pop. It'll make it look intentional, like you know what you're doin' and you're not a teenager tacking posters up in your room.
- Thin frames? Sleek and minimal.
- Chunky frames? More dramatic and bold.
- Matting? Adds breathing room and makes your art feel premium.
- No frame? Totally fine—just use poster rails, magnetic hangers, or a sleek acrylic mount for something different.
For more details on frames and framing your art and poster prints, check out our blog post on picking the right frame for your art.

5. The Nail vs. Command Strip Debate
Is this really a debate? The internet tells me it is and that's why I'm sitting here writing about it. More common sense and practical decision than anything, but here we are.
- Nails and hooks: Best for heavier framed prints, but make sure you hit a stud or use a proper wall anchor.
- Command strips: Ideal when you're renting, or if you're not quite sure you've nailed the layout (excuse the pun). OR, your partner likes to rearrange the entire layout of the house every year or so. Yup, I'm talking from experience here.
6. Lighting: Because Your Art Deserves a Spotlight
Look, most of us know art appreciates good lighting. Most of us also know lighting tracks and spots aren't in our budget. If you can, hang your art prints and poster prints in well lit areas of your home. But mostly, just try to avoid direct sunlight.
7. Trust the Process: The Paper & Photo Test
Before hanging cut some paper to size and tack it up to test your positioning. After hanging, step back and take a photo of your wall. It’s a weird trick, but somehow, flaws jump out in pictures more than real life. If something looks off, make a change.
Final Thoughts
Hanging art isn't rocket science, but it is design science and the basic rules of good design apply. Function. Balance. Intention. If you get it right, your space will feel comfortable—if you get it wrong, well, we won’t say anything, but your walls might.
Take your time, measure twice, and when in doubt, go BIGGER. Happy hanging!
Need More Prints? We’ve Got You Covered
Now that you know how to hang your digital art prints and posters properly, it’s time to fill those walls with stunning pieces! Check out our collection of gallery-quality art prints and find the perfect pieces to complete your space.